Building Single Sign-On with Keycloak
The Authentication Problem
I have multiple applications under dsalathe.dev: a blog, a tower defense game, a CV tailor tool, and more in development. Each needs user authentication. Each could implement its own login system.
But that’s terrible UX.
Users would need separate accounts for each app. Five apps? Five registrations. Five passwords. Five “forgot password” flows. Five separate user databases to secure and maintain.
This is the problem Single Sign-On (SSO) solves. Log in once, access everything.
Enter Keycloak—an open-source Identity and Access Management (IAM) solution that provides centralized authentication for all my applications. Think of it as running your own Auth0 or Okta, but self-hosted and free.
OAuth2 and OpenID Connect: The Foundation
Before diving into Keycloak, let’s clarify the protocols powering modern authentication.
OAuth2: Authorization Framework
OAuth2 is an authorization framework, not an authentication protocol. It answers the question: “What can you access?” not “Who are you?”
Core concept: Delegated access without sharing credentials.
Example: You use “Sign in with Google” on a third-party app. You’re not giving that app your Google password. Instead:
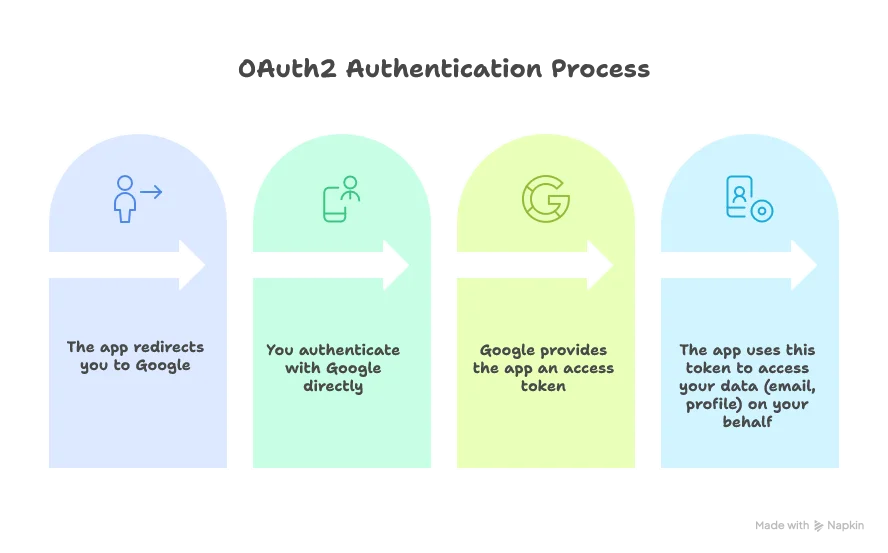
The app never sees your password. Google remains the gatekeeper.
OpenID Connect: Authentication Layer
OpenID Connect (OIDC) extends OAuth2 to handle authentication. It answers: “Who are you?”
OIDC adds an ID token (a JWT containing user identity claims) on top of OAuth2’s access token. This ID token tells applications who the authenticated user is.
Key difference:
- OAuth2: “This token lets you access the user’s calendar.” (authorization)
- OIDC: “This token proves the user is john@example.com.” (authentication)
Key Terminology
OAuth2 & OIDC Vocabulary
| Term | Definition |
|---|---|
| Resource Owner | The user who owns the data (you) |
| Client | The application requesting access (your web app) |
| Authorization Server | Issues tokens after authenticating the user (Keycloak) |
| Resource Server | Hosts protected resources, validates tokens (your backend API) |
| Access Token | Grants access to protected resources (technically opaque by OAuth2 spec, but Keycloak uses JWTs) |
| Refresh Token | Long-lived token to obtain new access tokens without re-authentication |
| ID Token | Contains user identity information as a JWT (OIDC-specific, always a JWT) |
| JWT | JSON Web Token—a compact, self-contained way to transmit claims securely |
PKCE: Securing Public Clients
PKCE (Proof Key for Code Exchange), pronounced “pixie,” is a security extension for OAuth2 that adds dynamic protection against authorization code interception.
The problem: Public clients (browser-based and mobile apps) can’t securely store a client secret. Any “secret” in JavaScript is visible to anyone. Even for confidential clients (server-side apps), authorization codes transmitted via redirects are vulnerable to interception.
The solution: PKCE adds a dynamically generated code verifier and code challenge to the flow:
- Client generates a random
code_verifier - Client creates a
code_challenge(SHA256 hash of verifier) - Authorization request includes the
code_challenge - After user authenticates, client receives an authorization code
- Client exchanges code +
code_verifierfor tokens - Authorization server verifies the verifier matches the challenge
Even if an attacker intercepts the authorization code, they can’t exchange it without the original code_verifier.
For public clients: PKCE provides security without requiring a client secret (since they can’t store one).
For confidential clients: PKCE is used in addition to the client secret, providing defense-in-depth.
Bottom line: PKCE is now recommended for all OAuth2 flows, not just public clients.
Why Keycloak?
Keycloak provides:
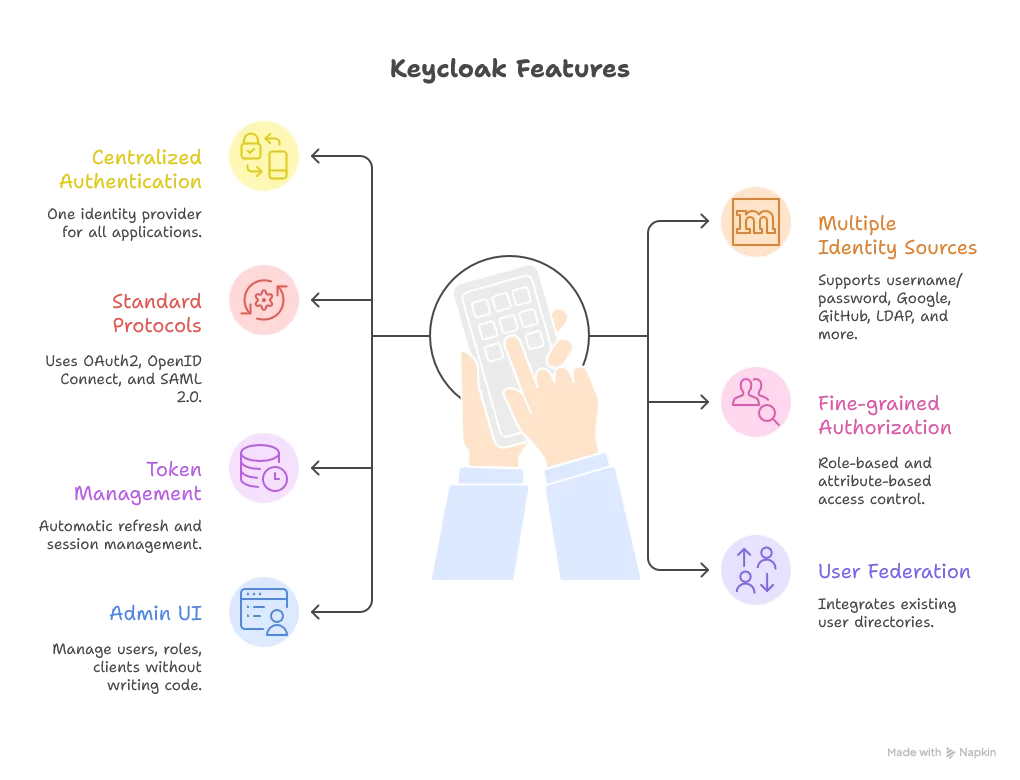
I’m running Keycloak at auth.dsalathe.dev, serving as the single source of truth for user identities across all my projects.
Development Setup
Let’s start with the local development environment. This setup uses Docker Compose with PostgreSQL as the database backend.
Docker Compose Configuration
services:
  postgres:
    image: postgres:17-alpine
    container_name: keycloak-db-local
    environment:
      POSTGRES_DB: keycloak
      POSTGRES_USER: keycloak
      POSTGRES_PASSWORD: ${DB_PASSWORD}
    volumes:
      - ./data/postgres:/var/lib/postgresql/data
    networks:
      - keycloak-network
    restart: unless-stopped
    healthcheck:
      test: ["CMD-SHELL", "pg_isready -U keycloak"]
      interval: 10s
      timeout: 5s
      retries: 5

  keycloak:
    image: quay.io/keycloak/keycloak:26.4
    container_name: keycloak-local
    command: start-dev
    environment:
      # Database
      KC_DB: postgres
      KC_DB_URL: jdbc:postgresql://postgres:5432/keycloak
      KC_DB_USERNAME: keycloak
      KC_DB_PASSWORD: ${DB_PASSWORD}

      # Local hostname
      KC_HOSTNAME: localhost
      KC_HOSTNAME_STRICT: false
      KC_HTTP_ENABLED: true

      # Admin credentials
      KEYCLOAK_ADMIN: ${KEYCLOAK_ADMIN}
      KEYCLOAK_ADMIN_PASSWORD: ${KEYCLOAK_ADMIN_PASSWORD}

      # Development settings
      KC_LOG_LEVEL: INFO
    volumes:
      - ./data/exports:/opt/keycloak/data/import:ro
    ports:
      - "8180:8080"
    depends_on:
      postgres:
        condition: service_healthy
    networks:
      - keycloak-network
    restart: unless-stopped

networks:
  keycloak-network:
    driver: bridge
Configuration Breakdown
PostgreSQL Service:
postgres:15-alpine: Lightweight PostgreSQL image- Healthcheck: Ensures database is ready before Keycloak starts
- Volume: Persists data across container restarts
- Environment variables: Database credentials from
.envfile
Keycloak Service:
quay.io/keycloak/keycloak:26.4: Official Keycloak image (version 26.4)start-dev: Development mode—relaxed security, auto-creates admin user, no HTTPS requiredKC_DB: Specifies PostgreSQL as the databaseKC_DB_URL: JDBC connection string pointing to thepostgresserviceKC_HOSTNAME: Set tolocalhostfor local developmentKC_HOSTNAME_STRICT: false: Allows flexible hostname configuration (required for dev)KC_HTTP_ENABLED: true: Permits HTTP traffic (dev only—production uses HTTPS via reverse proxy). Note: Keycloak 26+ requires this explicitly set even in dev mode for the admin console to work over HTTP- Port
8180:8080: Maps Keycloak’s internal port 8080 to host port 8180 (avoiding conflicts with other services) depends_onwith health condition: Waits for PostgreSQL to be healthy before starting
Environment Variables
Create a .env file in the same directory:
DB_PASSWORD=your_secure_database_password
KEYCLOAK_ADMIN=admin
KEYCLOAK_ADMIN_PASSWORD=your_admin_password
Security note: Never commit .env to version control. Add it to .gitignore.
Starting Keycloak
docker compose up -dKeycloak will be accessible at http://localhost:8180. Log in with the admin credentials from your .env file.
Essential Keycloak Configuration
Keycloak’s admin console can be overwhelming. Here are the key configurations that matter.
Understanding Keycloak Vocabulary
Keycloak Concepts
| Term | Definition |
|---|---|
| Realm | An isolated space for managing users, clients, and roles. Think of it as a tenant. |
| Client | An application that uses Keycloak for authentication (e.g., your web app). |
| Client Scope | Defines what information (claims) tokens should contain. |
| User | An account that can authenticate and access applications. |
| Role | A permission or privilege assigned to users (e.g., admin, premium). |
| Identity Provider (IdP) | External authentication source (Google, GitHub, etc.). |
| Mapper | Transforms or adds data to tokens (e.g., adding custom claims). |
Creating Your Realm
- Click “Create Realm” in the admin console
- Name it (e.g.,
dsalathe-apps) - Navigate to Realm Settings → Login
- Enable “Verify email”: Users must verify their email addresses before accessing apps
- Enable “Login with email”: Users can log in with email instead of username
Configuring Email
Keycloak needs SMTP configuration to send verification emails.
Using Gmail as SMTP:
- Go to Realm Settings → Email
- Configure:
- Host:
smtp.gmail.com - Port:
587 - From: Your Gmail address
- Enable StartTLS: Yes
- Username: Your Gmail address
- Password: Gmail App Password
- Host:
Important: You need a Gmail App Password, not your regular password. Generate one at myaccount.google.com/apppasswords.
- Test the configuration by clicking “Test connection”
Setting Default Roles
Navigate to Realm Settings → User Registration, then specify a default role (e.g., user). Every newly registered user automatically receives this role, providing baseline access across your applications.
Creating a Client
Clients represent your applications.
Key settings when creating a client:
- Client ID: A unique identifier (e.g.,
citybreakers,blog) - Client Protocol:
openid-connect(for OAuth2/OIDC) - Root URL: Your application’s base URL
- Valid Redirect URIs: Where Keycloak can redirect after authentication
- Development:
http://localhost:5173/* - Production:
https://citybreakers.dsalathe.dev/*
- Development:
- Web Origins: Allowed CORS origins (usually same as redirect URIs)
The “Client Authentication” Setting:
This is a common point of confusion.
-
Client Authentication ON (Confidential client): Your application backend must authenticate to Keycloak using a client secret. Use this for server-side apps that can securely store secrets.
-
Client Authentication OFF (Public client): No client secret required. The client uses PKCE for security instead. Use this for browser-based apps (Vue, React) and mobile apps that can’t securely store secrets.
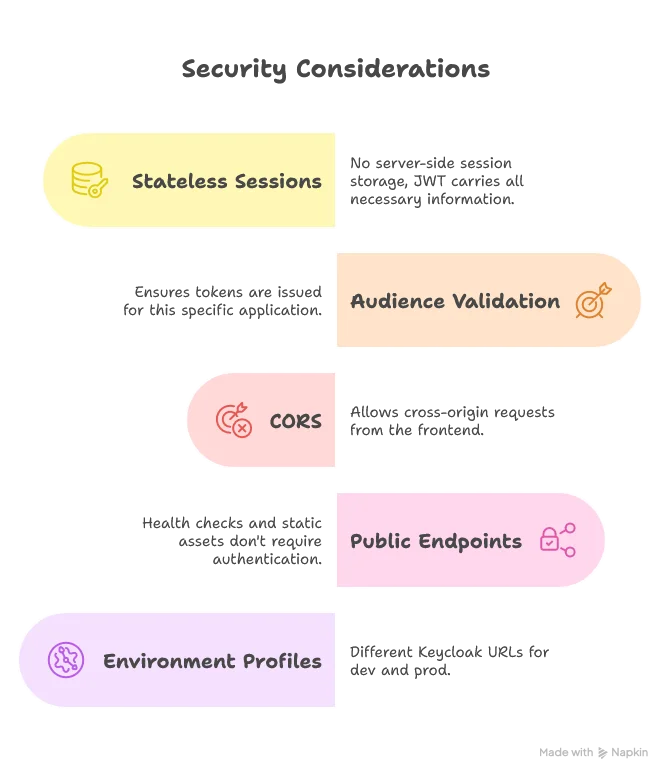
For web applications, you typically want Client Authentication OFF with PKCE enabled. The end users authenticate—not the application itself.
Audience Validation
When you have multiple clients (apps) in your realm, tokens should be scoped to specific applications. A token issued for App A shouldn’t be valid for App B.
Configure audience mapping:
- Go to your client (e.g.,
citybreakers) - Client Scopes → Dedicated scopes → Add mapper
- Mapper Type:
Audience - Included Client Audience: Select your client ID
- Add to access token: Yes
Now tokens issued for this client include an aud (audience) claim matching the client ID.
Backend validation: Your application backend should verify the aud claim matches the expected client ID. This prevents token reuse across applications.
Adding Google as an Identity Provider
Keycloak makes it trivial to add external identity providers.
Steps:
-
Google Cloud Console: Create OAuth2 credentials
- Go to Google Cloud Console
- Navigate to APIs & Services → Credentials
- Create OAuth 2.0 Client ID (Web application)
- Add authorized redirect URI:
http://localhost:8180/realms/dsalathe-apps/broker/google/endpoint(adjust for production) - Copy the Client ID and Client Secret
-
Keycloak: Add Google IdP
- Identity Providers → Add provider → Google
- Paste your Google Client ID and Client Secret
- Trust Email: Enable (Google already verifies emails, no need for Keycloak to send another verification email)
- Save
Publishing note: If you only request email/profile information from Google, you don’t need to publish your OAuth app. It will work in “testing” mode with up to 100 test users.
The Google Authentication Flow
When a user chooses “Sign in with Google”:
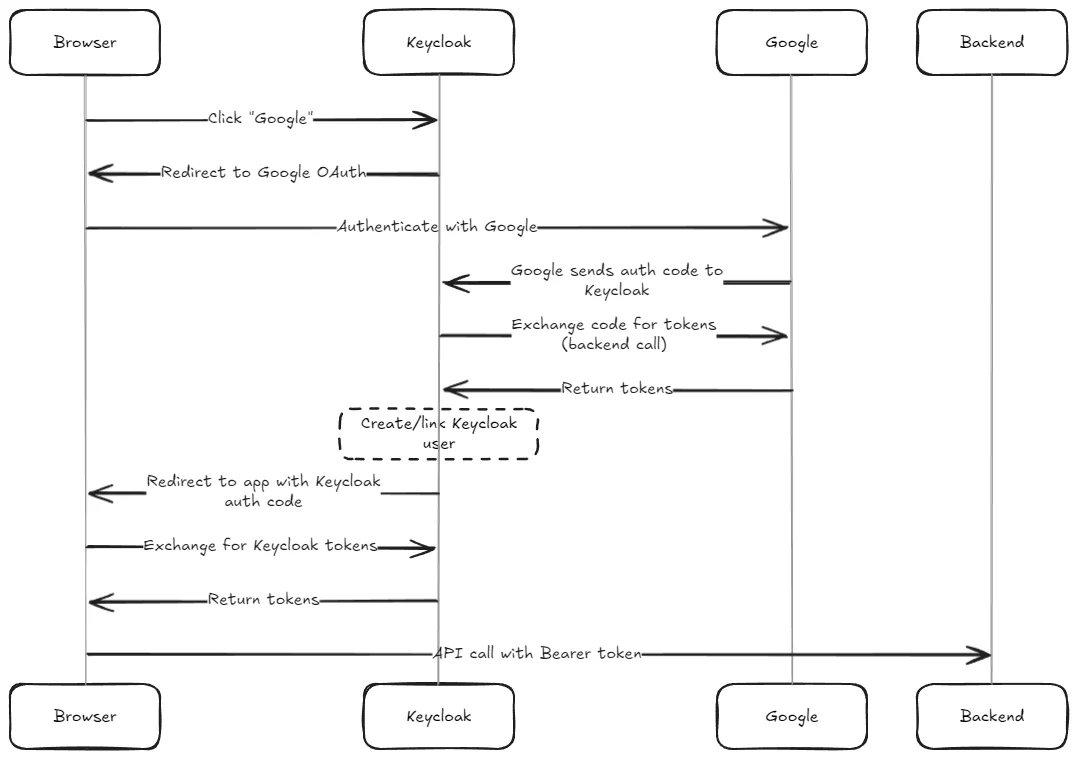
Notice the double token exchange: first Keycloak exchanges a code with Google (backend-to-backend, uses client secret), then your app exchanges a code with Keycloak (browser-to-backend, uses PKCE).
Production Setup
Production requires additional security and availability considerations.
Production Docker Compose
services:
  postgres:
    image: postgres:15-alpine
    container_name: keycloak-db-prod
    environment:
      POSTGRES_DB: keycloak
      POSTGRES_USER: keycloak
      POSTGRES_PASSWORD: ${DB_PASSWORD}
    volumes:
      - ./data/postgres:/var/lib/postgresql/data
    networks:
      - keycloak-network
    restart: unless-stopped
    healthcheck:
      test: ["CMD-SHELL", "pg_isready -U keycloak"]
      interval: 10s
      timeout: 5s
      retries: 5

  keycloak:
    image: quay.io/keycloak/keycloak:26.4
    container_name: keycloak-prod
    command: start
    environment:
      # Database
      KC_DB: postgres
      KC_DB_URL: jdbc:postgresql://postgres:5432/keycloak
      KC_DB_USERNAME: keycloak
      KC_DB_PASSWORD: ${DB_PASSWORD}

      # Production hostname
      KC_HOSTNAME: auth.dsalathe.dev
      KC_HOSTNAME_STRICT: true
      KC_HOSTNAME_STRICT_BACKCHANNEL: false

      # Proxy settings (Cloudflare Tunnel handles HTTPS)
      KC_PROXY: edge
      KC_PROXY_HEADERS: xforwarded

      # HTTP settings (Cloudflare Tunnel terminates SSL)
      KC_HTTP_ENABLED: true
      KC_HTTP_PORT: 8080

      # Admin credentials
      KEYCLOAK_ADMIN: ${KEYCLOAK_ADMIN}
      KEYCLOAK_ADMIN_PASSWORD: ${KEYCLOAK_ADMIN_PASSWORD}

      # Production settings
      KC_LOG_LEVEL: INFO
      KC_METRICS_ENABLED: true
      KC_HEALTH_ENABLED: true

    volumes:
      - ./data/exports:/opt/keycloak/data/import:ro
    networks:
      - keycloak-network
    restart: unless-stopped
    healthcheck:
      test: ["CMD-SHELL", "exec 3<>/dev/tcp/127.0.0.1/8080;echo -e 'GET /health/ready HTTP/1.1\r\nhost: auth.dsalathe.dev\r\nConnection: close\r\n\r\n' >&3;if [ $? -eq 0 ]; then echo 'Healthcheck Successful';exit 0;else echo 'Healthcheck Failed';exit 1;fi;"]
      interval: 30s
      timeout: 10s
      retries: 3
      start_period: 90s

  cloudflared:
    image: cloudflare/cloudflared:latest
    container_name: cloudflared-keycloak
    command: tunnel run
    environment:
      TUNNEL_TOKEN: ${CLOUDFLARE_TUNNEL_TOKEN}
    networks:
      - keycloak-network
    restart: unless-stopped
    depends_on:
      keycloak:
        condition: service_healthy

networks:
  keycloak-network:
    driver: bridge
Key Differences: Development vs Production
Development vs Production Configuration
| Configuration | Development | Production |
|---|---|---|
| Command | start-dev | start |
| Hostname | localhost | auth.dsalathe.dev |
| Hostname Strict | false | true |
| HTTP Enabled | true | true (Cloudflare handles HTTPS) |
| Proxy Mode | Not set | edge |
| Port Exposure | 8180:8080 | Not exposed (Cloudflare Tunnel) |
| Metrics | Disabled | Enabled |
| Health Checks | Basic | Advanced |
| SSL/TLS | Not required | Handled by Cloudflare |
Why KC_PROXY: edge?
Keycloak sits behind Cloudflare Tunnel, which terminates SSL/TLS and forwards traffic via HTTP. The edge proxy mode tells Keycloak to trust X-Forwarded-* headers from the edge proxy, ensuring it generates correct URLs (HTTPS, not HTTP) in redirects and tokens.
Why KC_HTTP_ENABLED: true in production?
Cloudflare Tunnel handles HTTPS termination. The tunnel communicates with Keycloak via HTTP internally. This is secure because the tunnel runs on the same server, and all external traffic uses HTTPS.
Advanced Healthcheck:
The production healthcheck uses a TCP connection to verify Keycloak’s /health/ready endpoint. This ensures Keycloak is fully initialized before Cloudflare Tunnel starts routing traffic.
Integrating Keycloak with Vue 3 and Spring Boot
Now that Keycloak is running, let’s integrate it with a real application: a Vue 3 frontend and Spring Boot backend.
Frontend: Vue 3 with keycloak-js
Install the Keycloak JavaScript adapter:
npm install keycloak-jsCore authentication files:
import Keycloak, { KeycloakConfig } from 'keycloak-js';
const keycloakConfig: KeycloakConfig = {
url: import.meta.env.VITE_KEYCLOAK_URL,
realm: 'dsalathe-apps',
clientId: 'citybreakers',
};
const keycloak = new Keycloak(keycloakConfig);
let isInitialized = false;
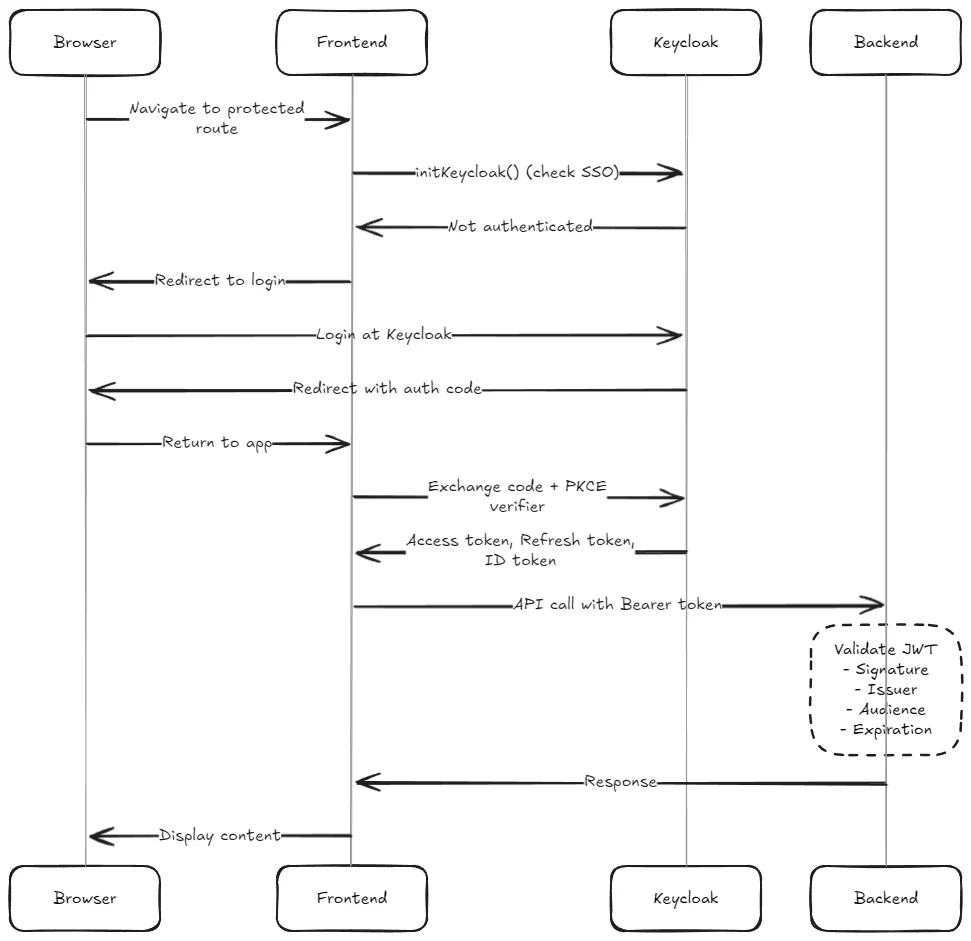
export async function initKeycloak(): Promise<boolean> {
if (isInitialized) return keycloak.authenticated || false;
const authenticated = await keycloak.init({
onLoad: 'check-sso',
silentCheckSsoRedirectUri: window.location.origin + '/silent-check-sso.html',
pkceMethod: 'S256',
});
isInitialized = true;
// Background token refresh
setInterval(async () => {
if (keycloak.isTokenExpired(60)) {
await keycloak.updateToken(60);
}
}, 30000);
return authenticated;
}
export async function getAccessToken(): Promise<string | undefined> {
if (keycloak.isTokenExpired(60)) {
await keycloak.updateToken(60);
}
return keycloak.token;
}
export function getUserInfo() {
return {
username: keycloak.tokenParsed?.preferred_username,
email: keycloak.tokenParsed?.email,
roles: [
...(keycloak.realmAccess?.roles || []),
...(keycloak.resourceAccess?.['citybreakers']?.roles || []),
],
};
}
export function logout() {
keycloak.logout({ redirectUri: window.location.origin });
}
export default keycloak;import axios from 'axios';
import { getAccessToken } from './keycloak';
const api = axios.create({
baseURL: import.meta.env.VITE_API_URL,
});
api.interceptors.request.use(async (config) => {
const token = await getAccessToken();
if (token) {
config.headers.Authorization = `Bearer ${token}`;
}
return config;
});
export default api;<!DOCTYPE html>
<html>
<head>
<title>SSO</title>
</head>
<body>
<script>
parent.postMessage(location.href, location.origin);
</script>
</body>
</html># .env.development
VITE_KEYCLOAK_URL=http://localhost:8180
# .env.production
VITE_KEYCLOAK_URL=https://auth.dsalathe.devKey design choices:
- Public client with PKCE (
S256): Secure code exchange without client secrets onLoad: 'check-sso': Silently checks if the user is already authenticated (SSO)- Background token refresh: Every 30 seconds, refreshes tokens expiring within 60 seconds
- Singleton pattern: One Keycloak instance, reused across components
Backend: Spring Boot Resource Server
Core security configuration files:
<dependency>
    <groupId>org.springframework.boot</groupId>
    <artifactId>spring-boot-starter-oauth2-resource-server</artifactId>
</dependency>
<dependency>
    <groupId>org.springframework.boot</groupId>
    <artifactId>spring-boot-starter-security</artifactId>
</dependency>@Configuration
@EnableWebSecurity
public class SecurityConfig {
@Value("${spring.security.oauth2.resourceserver.jwt.issuer-uri}")
private String issuerUri;
@Bean
public SecurityFilterChain securityFilterChain(HttpSecurity http) throws Exception {
http
.csrf(csrf -> csrf.disable())
.cors(cors -> cors.configurationSource(corsConfigurationSource()))
.authorizeHttpRequests(auth -> auth
.requestMatchers("/", "/api/health", "/assets/**").permitAll()
.requestMatchers("/api/**").authenticated()
.anyRequest().denyAll()
)
.oauth2ResourceServer(oauth2 -> oauth2
.jwt(jwt -> jwt.decoder(jwtDecoder()))
)
.sessionManagement(session -> session
.sessionCreationPolicy(SessionCreationPolicy.STATELESS)
);
return http.build();
}
@Bean
public JwtDecoder jwtDecoder() {
NimbusJwtDecoder jwtDecoder = JwtDecoders.fromIssuerLocation(issuerUri);
jwtDecoder.setJwtValidator(new DelegatingOAuth2TokenValidator<>(
JwtValidators.createDefaultWithIssuer(issuerUri),
new AudienceValidator("citybreakers")
));
return jwtDecoder;
}
@Bean
public CorsConfigurationSource corsConfigurationSource() {
CorsConfiguration configuration = new CorsConfiguration();
configuration.setAllowedOrigins(List.of("http://localhost:5173", "https://citybreakers.dsalathe.dev"));
configuration.setAllowedMethods(List.of("GET", "POST", "PUT", "DELETE"));
configuration.setAllowedHeaders(List.of("*"));
configuration.setAllowCredentials(true);
UrlBasedCorsConfigurationSource source = new UrlBasedCorsConfigurationSource();
source.registerCorsConfiguration("/**", configuration);
return source;
}
}public class AudienceValidator implements OAuth2TokenValidator<Jwt> {
private final String audience;
public AudienceValidator(String audience) {
this.audience = audience;
}
@Override
public OAuth2TokenValidatorResult validate(Jwt jwt) {
List<String> audiences = jwt.getAudience();
if (audiences != null && audiences.contains(audience)) {
return OAuth2TokenValidatorResult.success();
}
return OAuth2TokenValidatorResult.failure(
new OAuth2Error("invalid_token", "Required audience not found", null)
);
}
}# application.properties (development)
spring.security.oauth2.resourceserver.jwt.issuer-uri=http://localhost:8180/realms/dsalathe-apps
# application-prod.properties (production)
spring.security.oauth2.resourceserver.jwt.issuer-uri=https://auth.dsalathe.dev/realms/dsalathe-appsKey design choices:
The Complete Authentication Flow
Lessons Learned
Client Authentication Confusion
The biggest conceptual hurdle: Client Authentication doesn’t mean “the client authenticates users.” It means “the client (application) authenticates itself to Keycloak.”
- ON: Confidential client. Backend has a secret, exchanges it for tokens.
- OFF: Public client. Users authenticate, PKCE provides security without secrets.
For browser-based apps, you almost always want OFF with PKCE.
Audience Scoping is Critical
Without audience validation, a token issued for App A works for App B. This defeats the purpose of token scoping.
Always configure audience mappers in Keycloak and validate the aud claim in your backend.
Token Refresh for Long Sessions
Short-lived access tokens (5-15 minutes) improve security. But users shouldn’t re-authenticate every 5 minutes.
Solution: Background refresh using refresh tokens. The frontend periodically checks token expiration and refreshes silently.
Trust Email for External IdPs
When users authenticate via Google, their email is already verified by Google. Keycloak doesn’t need to send another verification email.
Enable Trust Email for external identity providers to avoid redundant verification.
What’s Next
With auth.dsalathe.dev operational, all future projects under dsalathe.dev can use centralized authentication.
Planned integrations:
- cvtailor.dsalathe.dev: User-specific CV storage, AI-powered tailoring and user role-specific quotas
- citybreakers.dsalathe.dev: Matchmaking, leaderboards, and premium features
- tchutchu.dsalathe.dev: Custom-defined maps, leaderboards.
One login. One identity. Infinite possibilities.
Single Sign-On isn’t just a convenience—it’s a fundamental improvement to user experience and security architecture. Keycloak makes it achievable for personal projects, not just enterprise systems.
Authentication: solved.